[Kotlin] Flow 구현체 파헤치기
앱 개발에 있어 자주 사용되는 Flow 구현을 파헤쳐보겠다. 버전은 kotlinx-coroutines-core-jvm-1.6.4 기준이다.
Flow
Flow는 Cold Stream이고 단순한 예제는 다음과 같다.
5번 방출을 하는 flow를 선언하였고 이를 collect하여 순차적으로 값들을 출력한다.
flow {
    repeat(5) { n ->
        emit(n)
    }
}.collect { n ->
    println(n)
}

// 출력 결과
// 0
// 1
// 2
// 3
// 4
flow 함수 구현은 아래와 같다. SafeFlow 클래스를 생성하는 모습이다. 이때 FlowCollector 컨텍스트로 된 block 함수가 인자로 전달된다.
fun <T> flow(@BuilderInference block: suspend FlowCollector<T>.() -> Unit): Flow<T> = SafeFlow(block)
SafeFlow를 살펴보기 전에 Flow를 확인해보자. 먼저 Flow의 선언부이다. collect라는 함수가 있고 매개변수로 FlowCollector가 있다.
FlowCollector는 emit 함수가 존재한다. FlowCollector가 fun interface인 이유는 Kotlin에서 SAM(Single Abstract Method) 특성을 사용하기 위해서이다.
interface Flow<out T> {
    suspend fun collect(collector: FlowCollector<T>)
}

fun interface FlowCollector<in T> {
    suspend fun emit(value: T)
}
그렇다면 저 interface들이 어떻게 이용될까? SafeFlow를 보면 AbstractFlow를 상속하였다.
AbstractFlow는 Flow를 구현하였고 collector를 전달받아 SafeCollector로 감싸서 collectSafely를 호출한다.
SafeFlow의 collectSafely 함수는 앞서 flow 함수로 생성했던 그 block을 실행한다.
이때 block으로 작성했던 FlowCollector.emit()이 5번 호출되고, 방출된 값을 출력하게 된것이다.
class SafeFlow<T>(private val block: suspend FlowCollector<T>.() -> Unit) : AbstractFlow<T>() {

    override suspend fun collectSafely(collector: FlowCollector<T>) {
        collector.block()
    }
}

abstract class AbstractFlow<T> : Flow<T>, CancellableFlow<T> {

    public final override suspend fun collect(collector: FlowCollector<T>) {
        val safeCollector = SafeCollector(collector, coroutineContext)
        try {
            collectSafely(safeCollector)
        } finally {
            safeCollector.releaseIntercepted()
        }
    }

    abstract suspend fun collectSafely(collector: FlowCollector<T>)
}
무언가 알듯말듯하다. 이해하기 쉽도록 예제 코드를 수정하여 다시 살펴보자. 아래는 기존 예제 코드를 생략하지 않고 작성한 코드이다.
val myFlow = flow(
    block = {
        repeat(5) {
            emit(it)
        }
    }
)
myFlow.collect(
    collector = object : FlowCollector<Int> {
        override suspend fun emit(value: Int) {
            println(value)
        }
    }
)
Flow를 생성하면 SafeFlow의 생성자 매개변수로 아래의 블록이 전달되고
block = {
    repeat(5) {
        emit(it)
    }
}
Flow의 collect를 호출하면 익명의 클래스가 인자로 전달되어 해당 블록이 실행된다. 주석 처리된 부분을 보면 이해하기 수월하다.
class SafeFlow<T>(private val block: suspend FlowCollector<T>.() -> Unit) : AbstractFlow<T>() {

    override suspend fun collectSafely(collector: FlowCollector<T>) {
        // collector = object : FlowCollector<Int> {
        //     override suspend fun emit(value: Int) {
        //         println(value)
        //     }
        // }
        //
        // block = {
        //     repeat(5) {
        //         emit(it)
        //     }
        // }
        collector.block()
    }
}
정리하자면 아래의 흐름이다.
- Cold Stream인
Flow의collect를 호출 - flow를 생성할 때 전달했던
block함수를 호출 block함수에서emit을 호출했다면, 인자로 전달받은collector의 오버라이드된emit함수가 호출됨
SharedFlow
이번에는 Hot Stream인 SharedFlow를 파헤치기 앞서서, 전체적인 동작 과정을 설명해보겠다.
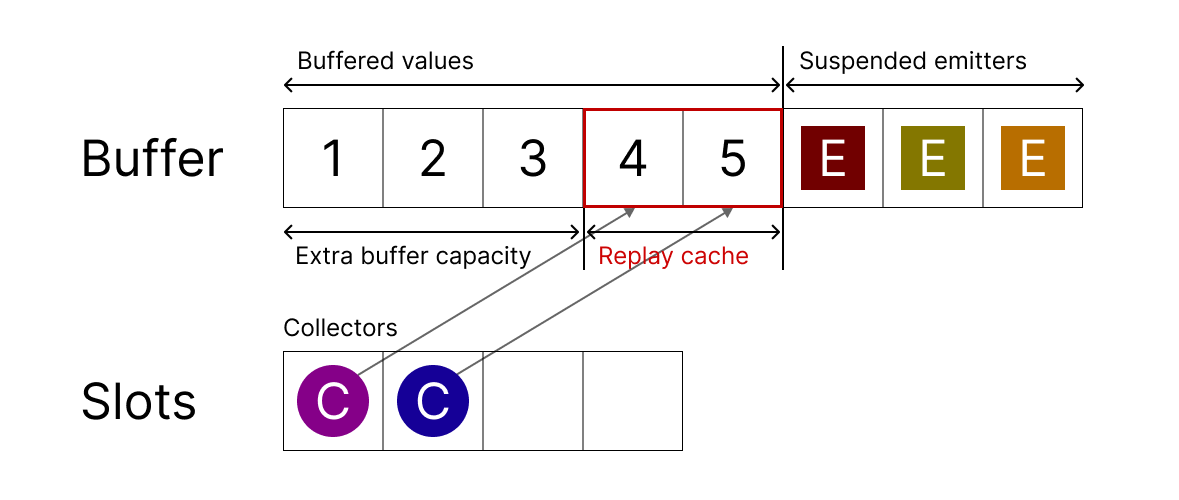
- Buffer: 생성자에 의해 방출된 값들이 구독자들에게 읽히기 위해 저장되는 곳이다. 또한 Emitter가 일시중단될 때도 이곳에 저장된다.
- Slot: 구독자를 위해 할당하는 공간. collect가 중단되어 새로 방출되는 값을 대기하는
Continuation과, 방출될 값의 버퍼 인덱스 등을 저장한다.
Collector
FlowCollector를 인자로 넘기며SharedFlow.collect함수 호출Slot을 할당받음- 새로 방출된 값이 존재한다면
FlowCollector.emit호출, 방출된 값이 없다면suspendCancellableCoroutine를 호출하여Continuation을Slot에 저장하고 await - 3을 계속 반복하다가 예외 발생시 할당 받은
Slot을 해제
Provider
SharedFlow.emit을 호출- 곧바로 방출 가능한 경우 버퍼에 값을 쓰고
Slot목록에 저장된Continuation의resume을 호출 orEmitter를 대기 큐에 넣음, 이때 버퍼 값 중 하나를 drop 할 수도 있음 - 값을 방출할 때 대기 큐에 있는
Emitter를resume
자 이제 SharedFlow를 파헤쳐보자! SharedFlow를 만드는 방법은 크게 아래의 두 가지가 존재한다.
MutableSharedFlow를 만들어 사용하기sharedIn을 이용하여 Cold Stream을 Hot Stream으로 변환하기
이 글에서는 첫 번째 항목으로 설명하겠다. MutableSharedFlow는 아래와 같이 MutableSharedFlow() 함수를 이용하여 생성할 수 있다.
val sharedFlow = MutableSharedFlow<Int>()
launch {
    sharedFlow.collect {
        println(it)
    }
}
launch {
    repeat(5) {
        sharedFlow.emit(it)
    }
}

// 0
// 1
// 2
// 3
// 4
그렇다면 MutableSharedFlow 함수를 살펴보자. 내부적으로 SharedFlowImpl를 호출하는 것을 볼 수 있다.
fun <T> MutableSharedFlow(
    replay: Int = 0,
    extraBufferCapacity: Int = 0,
    onBufferOverflow: BufferOverflow = BufferOverflow.SUSPEND
): MutableSharedFlow<T> {
    // ...
    val bufferCapacity0 = replay + extraBufferCapacity
    val bufferCapacity = if (bufferCapacity0 < 0) Int.MAX_VALUE else bufferCapacity0 // coerce to MAX_VALUE on overflow
    return SharedFlowImpl(replay, bufferCapacity, onBufferOverflow)
}
SharedFlowImpl는 MutableSharedFlow를 구현했으며 생성자는 아래와 같다.
internal open class SharedFlowImpl<T>(
    private val replay: Int,
    private val bufferCapacity: Int,
    private val onBufferOverflow: BufferOverflow
) : AbstractSharedFlow<SharedFlowSlot>(), MutableSharedFlow<T>, CancellableFlow<T>, FusibleFlow<T> {

    // ...
}
MutableSharedFlow를 살펴보기 전에, SharedFlow 인터페이스를 살펴보자. SharedFlow는 Flow에서 replayCache가 추가로 존재한다.
이 프로퍼티는 새로운 구독자가 등장했을 때 최근 방출된 값을 몇 개를 새로운 구독자에게 전달할지 결정한다.
interface SharedFlow<out T> : Flow<T> {

    val replayCache: List<T>

    override suspend fun collect(collector: FlowCollector<T>): Nothing
}
MutableSharedFlow는 다음과 같다. 값을 방출 할 수 있도록 emit 그리고 tryEmit이 존재한다. 이 두 함수의 차이점은 추후에 살펴볼 것이다.
interface MutableSharedFlow<T> : SharedFlow<T>, FlowCollector<T> {

    override suspend fun emit(value: T)

    fun tryEmit(value: T): Boolean

    val subscriptionCount: StateFlow<Int>

    fun resetReplayCache()
}
이제 대망의 SharedFlowImpl를 하나씩 파헤쳐보자. 코드 흐름상 collect 함수를 살펴보자.
이 함수의 핵심은 두 개의 while 문이다. 먼저 이 함수는 중단함수이기 때문에 코루틴에서 돌아간다.
첫 while 문을 진입하고 두 번째 while 문을 진입한다. 두 번째 while 문에서는 slot의 값을 가져와본다.
만약 있다면 while 문을 탈출하여 중단없이 FlowCollect.emit을 호출하면 된다.
아니라면 awaitValue 함수를 호출하여 방출될 때까지 코루틴을 일시정지한다.
override suspend fun collect(collector: FlowCollector<T>): Nothing {
    val slot = allocateSlot()
    try {
        if (collector is SubscribedFlowCollector) collector.onSubscription()
        val collectorJob = currentCoroutineContext()[Job]
        while (true) {
            var newValue: Any?
            while (true) {
                newValue = tryTakeValue(slot) // attempt no-suspend fast path first
                if (newValue !== NO_VALUE) break
                awaitValue(slot) // await signal that the new value is available
            }
            collectorJob?.ensureActive()
            collector.emit(newValue as T)
        }
    } finally {
        freeSlot(slot)
    }
}
awaitValue 함수를 살펴보자. suspendCancellableCoroutine를 이용했기 때문에 continuation을 전달하여 외부 스코프에서 이 코루틴을 재개할 수 있도록 하였다.
실제로 slot.cont는 emit을 호출할때 resume이 호출되어 재개된다.
private suspend fun awaitValue(slot: SharedFlowSlot): Unit = suspendCancellableCoroutine { cont ->
    synchronized(this) lock@{
        val index = tryPeekLocked(slot) // recheck under this lock
        if (index < 0) {
            slot.cont = cont // Ok -- suspending
        } else {
            cont.resume(Unit) // has value, no need to suspend
            return@lock
        }
        slot.cont = cont // suspend, waiting
    }
}
그렇다면 이제는 emit 함수를 살펴보자. 중단 없는 방출을 시도해보고, 안된다면 중단하며 방출을 시도한다.
override suspend fun emit(value: T) {
    if (tryEmit(value)) return // fast-path
    emitSuspend(value)
}
tryEmit 함수는 tryEmitLocked를 호출는데 여기서는 replayCache, extraBufferSize 그리고 현재 버퍼 크기, 대기 큐에 있는 값들 등을 고려하여 방출을 시도한다.
만약 방출에 성공한다면 findSlotsToResumeLocked를 호출하여 앞서 설명한 재개될 Slot들을 가져온다. 그리고 resume을 통해 값이 실제로 방출된다.
 override fun tryEmit(value: T): Boolean {
    var resumes: Array<Continuation<Unit>?> = EMPTY_RESUMES
    val emitted = synchronized(this) {
        if (tryEmitLocked(value)) {
            resumes = findSlotsToResumeLocked(resumes)
            true
        } else {
            false
        }
    }
    for (cont in resumes) cont?.resume(Unit)
    return emitted
}
tryEmit에서 방출을 못한 경우 emitSuspend가 호출되고 대기 큐에 넣어진다. Emitter를 생성하는 부분을 유심히 살펴보면 된다.
private suspend fun emitSuspend(value: T) = suspendCancellableCoroutine<Unit> sc@{ cont ->
    var resumes: Array<Continuation<Unit>?> = EMPTY_RESUMES
    val emitter = synchronized(this) lock@{
        // recheck buffer under lock again (make sure it is really full)
        if (tryEmitLocked(value)) {
            cont.resume(Unit)
            resumes = findSlotsToResumeLocked(resumes)
            return@lock null
        }
        // add suspended emitter to the buffer
        Emitter(this, head + totalSize, value, cont).also {
            enqueueLocked(it)
            queueSize++ // added to queue of waiting emitters
            // synchronous shared flow might rendezvous with waiting emitter
            if (bufferCapacity == 0) resumes = findSlotsToResumeLocked(resumes)
        }
    }
    // outside of the lock: register dispose on cancellation
    emitter?.let { cont.disposeOnCancellation(it) }
    // outside of the lock: resume slots if needed
    for (r in resumes) r?.resume(Unit)
}
그렇다면 대기 큐에 넣어진 Emitter들은 언제 재개될까? 바로 collect를 하여 값을 수집하고 난 후이다.
물론 항상 값을 수집하고 난 후에 재개되지는 않고 현재 사용되는 버퍼 크기 등을 고려해서 재개된다.
앞선 collect 함수 설명에서 tryTakeValue를 호출하는 것을 볼 수 있었다.
이 함수는 아래처럼 PEEK을 성공한 경우 updateCollectorIndexLocked를 호출한다.
바로 이 함수에서 대기 큐의 Emitter들이 재개가 되는 것이다.
// returns NO_VALUE if cannot take value without suspension
private fun tryTakeValue(slot: SharedFlowSlot): Any? {
    var resumes: Array<Continuation<Unit>?> = EMPTY_RESUMES
    val value = synchronized(this) {
        val index = tryPeekLocked(slot)
        if (index < 0) {
            NO_VALUE
        } else {
            val oldIndex = slot.index
            val newValue = getPeekedValueLockedAt(index)
            slot.index = index + 1 // points to the next index after peeked one
            resumes = updateCollectorIndexLocked(oldIndex)
            newValue
        }
    }
    for (resume in resumes) resume?.resume(Unit)
    return value
}
StateFlow
마지막으로 StateFlow이다. StateFlow는 SharedFlow 보다 단순하게 동작하며, 초기값이 존재하고 중복되는 값으로 상태를 수정하면 방출되지 않는다. 상태가 변경된 경우 값이 방출된다.
val stateFlow = MutableStateFlow(1)
launch {
    stateFlow.collect {
        println(it)
    }
}
repeat(4) {
    delay(100)
    stateFlow.update { it + 1 }
}

// 1
// 2
// 3
// 4
// 5
public fun <T> MutableStateFlow(value: T): MutableStateFlow<T> = StateFlowImpl(value ?: NULL)
StateFlowImpl을 살펴보기 전에 StateFlow, MutableStateFlow 인터페이스를 확인해보자.
현재 상태인 value를 가지고 있고 MutableStateFlow의 경우 상태 쓰기를 허용한다.
또한 원자적으로 상태값을 갱신하기 위한 compareAndSet 함수가 정의되어있다.
interface StateFlow<out T> : SharedFlow<T> {
    val value: T
}

interface MutableStateFlow<T> : StateFlow<T>, MutableSharedFlow<T> {

    override var value: T

    fun compareAndSet(expect: T, update: T): Boolean
}
이제 StateFlowImpl의 collect 함수를 살펴보자.
oldState가 null이라는 뜻은 아직 아무것도 방출되지 않음을 나타내고 있다.
계속해서 반복문을 돌면서 이전 상태와 새로운 상태가 다른지 비교하고 다르다면 값을 방출한다.
그 후 await가 필요한 경우 Slot을 await 한다.
override suspend fun collect(collector: FlowCollector<T>): Nothing {
    val slot = allocateSlot()
    try {
        if (collector is SubscribedFlowCollector) collector.onSubscription()
        val collectorJob = currentCoroutineContext()[Job]
        var oldState: Any? = null // previously emitted T!! | NULL (null -- nothing emitted yet)
        // The loop is arranged so that it starts delivering current value without waiting first
        while (true) {
            // Here the coroutine could have waited for a while to be dispatched,
            // so we use the most recent state here to ensure the best possible conflation of stale values
            val newState = _state.value
            // always check for cancellation
            collectorJob?.ensureActive()
            // Conflate value emissions using equality
            if (oldState == null || oldState != newState) {
                collector.emit(NULL.unbox(newState))
                oldState = newState
            }
            // Note: if awaitPending is cancelled, then it bails out of this loop and calls freeSlot
            if (!slot.takePending()) { // try fast-path without suspending first
                slot.awaitPending() // only suspend for new values when needed
            }
        }
    } finally {
        freeSlot(slot)
    }
}
값을 새로 갱신하는 경우 아래의 updateState 함수가 호출된다.
override var value: T
    get() = NULL.unbox(_state.value)
    set(value) { updateState(null, value ?: NULL) }
updateState 함수는 CAS(Compare And Swap) 알고리즘을 이용하여 oldState와 expectedState가 일치하지 않는 경우 함수를 종료한다. 그리고 갱신할 값과 이전 값이 같은 경우 또한 함수를 종료한다.
그리고 상태를 새로운 값으로 갱신한다.
이 함수에서는 sequence를 이용하여 serializes updates를 구현한다. sequence가 홀수이면 업데이트가 진행중 인것이고, 짝수이면 업데이트중이 아니다. 이 부분은 무엇을 위한 것인지 더 공부해봐야겠다.(아시는 분 댓글 부탁드립니다.)
private fun updateState(expectedState: Any?, newState: Any): Boolean {
    var curSequence = 0
    var curSlots: Array<StateFlowSlot?>? = this.slots // benign race, we will not use it
    synchronized(this) {
        val oldState = _state.value
        if (expectedState != null && oldState != expectedState) return false // CAS support
        if (oldState == newState) return true // Don't do anything if value is not changing, but CAS -> true
        _state.value = newState
        curSequence = sequence
        if (curSequence and 1 == 0) { // even sequence means quiescent state flow (no ongoing update)
            curSequence++ // make it odd
            sequence = curSequence
        } else {
            // update is already in process, notify it, and return
            sequence = curSequence + 2 // change sequence to notify, keep it odd
            return true // updated
        }
        curSlots = slots // read current reference to collectors under lock
    }

    // ...
}
그리고 난 후 현재 슬롯들 모두 makePending을 호출하여 await 중인 코루틴을 재개한다.
Unconfined Coroutine으로 발생할 수 있는 데드락을 피하기 위해 lock 바깥에서 아래의 코드를 실행한다고 한다.
lock 안에서 makePending을 호출하면 왜 데드락이 발생하는지, 아래의 코드가 어떻게 데드락을 막을 수 있는지 잘 모르겠다…(아시는 분 댓글 부탁드립니다.)
private fun updateState(expectedState: Any?, newState: Any): Boolean {
    // ...

    /*
        Fire value updates outside of the lock to avoid deadlocks with unconfined coroutines.
        Loop until we're done firing all the changes. This is a sort of simple flat combining that
        ensures sequential firing of concurrent updates and avoids the storm of collector resumes
        when updates happen concurrently from many threads.
    */
    while (true) {
        // Benign race on element read from array
        curSlots?.forEach {
            it?.makePending()
        }
        // check if the value was updated again while we were updating the old one
        synchronized(this) {
            if (sequence == curSequence) { // nothing changed, we are done
                sequence = curSequence + 1 // make sequence even again
                return true // done, updated
            }
            // reread everything for the next loop under the lock
            curSequence = sequence
            curSlots = slots
        }
    }
}
배운점
- Cold Stream과 Hot Stream이 내부적으로 어떻게 달리 동작하는지 알게되었다.
- Hot Stream은 내부적으로 slot과
suspendCancellableCoroutine을 적극 활용하여 동작한다. - Flow는 LiveData와 달리 코루틴의 특성을 잘 활용하여 구현했다.

댓글남기기